What is Taiga?
Taiga is an awesome agile team management tool. Think of it as more advanced than Trello, but less advanced than Jira. Don’t let that fool you though, you can do most things Jira can do and it’s a lot nicer to work with. It has the full range of features you’d expect, such as Scrum and Kanban Support, Ticket management, configurable sprints, burndown charts and Epic linking. Further it supports import from Trello (and a few others), integration with Github/Gitlab. For a complete and up to date feature list, have a look at the official Taiga site here. Also note, it is available as open source or paid options, the only difference with the paid option being that they host it for you.
Why did I write this?
If you’re like me and ever having tried Taiga, it’s pretty frustrating such an awesome product loses customers over what looks like great documentation, but misses out a lot of the basics. Such as how to actually set it up so that it can be accessed behind a reverse proxy. This page outlines how I got mine set up with default settings, so that you can modify from there. There is still an unofficial omnibus docker image here you can use, but for this guide, I’m using the official Taiga docker method which requires unfortunately docker compose.
Mostly these days, I use docker in behind something like unraid, or the new TrueNAS Scale, but those platforms don’t play well with docker compose out of the box. So for Taiga, given I needed a production instance, I opted for a small Ubuntu Server OS (no GUI) and installing docker compose and docker on that.
Some great guides for getting docker and docker-compose installed to latest versions for Ubuntu are at Digital Ocean e.g. here.
Please note the master taiga documentation here.
The process
Typical to Taiga, they don’t do things like everyone else and as such Taiga docker doesn’t work like other docker instances. That’s the first stumbling block is others coming along get stumped and give up. What they do is have a git repo, which you clone then configure by hand at the command line, then publish into dockers by using docker-compose. Rinse and repeat when your config changes. It’s quite horrible if you’re only used to things like unraid, but if you’re more familiar with the devops side of things, it’s a tad more familiar.
Step 1: Clone the files
git clone https://github.com/kaleidos-ventures/taiga-docker
cd taiga-docker
git checkout stable
Step 2: Edit the config files
docker-compose.yml
&default-back-environment
POSTGRES_DB:  taiga
POSTGRES_USER: taiga
POSTGRES_PASSWORD: yourdbpassword
TAIGA_SECRET_KEY: "your secret key"
TAIGA_SITES_DOMAIN: “taiga.yourdomain.com:443”
TAIGA_SITES_SCHEME: “https”

Taiga-db
POSTGRES_DB:  taiga
POSTGRES_USER: taiga
POSTGRES_PASSWORD: yourdbpassword #same as above)

Taiga-events
TAIGA_SECRET_KEY: "your secret key" #same as above

Taiga-protected
TAIGA_SECRET_KEY: "your secret key" #same as above

Taiga-front
TAIGA_URL: “https://taiga.yourdomain.com:443”
TAIGA_WEBSOCKETS_URL: “wss://taiga.yourdomain.com:443"

taiga-gateway
ports:
  - "443:443"
docker-compose-inits.yml
&default-back-environment
POSTGRES_PASSWORD: your db password #same as above
TAIGA_SECRET_KEY: "your secret key" #same as above
Other
Of course you should really update your RABBITMQ_PASS as well, but you get the idea.
The other part of course is the NGINX reverse proxy. I use a great little docker container for this called Swag that handles the proxying and SSL via lets encrypt. You can find this here.
I haven’t gone into the details of setting that up as there is plenty of good documentation on how to do that around the web, however the NGINX file you need to create within it would be as follows:
taiga.subdomain.conf
server {
    listen 443 ssl;
    listen [::]:443 ssl;

    server_name taiga.yourdomain.com;

    include /config/nginx/ssl.conf;

    client_max_body_size 0;
    large_client_header_buffers 4 32k;
    charset utf-8;

    # enable for ldap auth, fill in ldap details in ldap.conf
    #include /config/nginx/ldap.conf;

    # access_log /home/taiga/logs/nginx.access.log;
    # error_log /home/taiga/logs/nginx.error.log;

    # Frontend
    location / {
        include /config/nginx/proxy.conf;
        resolver 127.0.0.11 valid=30s;
        set $upstream_app taiga;
        set $upstream_port 443;
        set $upstream_proto http;
#        proxy_pass $upstream_proto://$upstream_app:$upstream_port;
	 proxy_pass http://192.168.1.18:443;
    }
}
Note the last line and the hashed out line before it. I tend to like to just type things, but if you prefer you can swap that around. The proxy pass line should point to the host ip of your ubuntu server. This allows your newly set up ‘swag’ container to proxy web sites to any number of hosts on the internal network with a single IP address – ssl certificate all taken care of as part of the process.
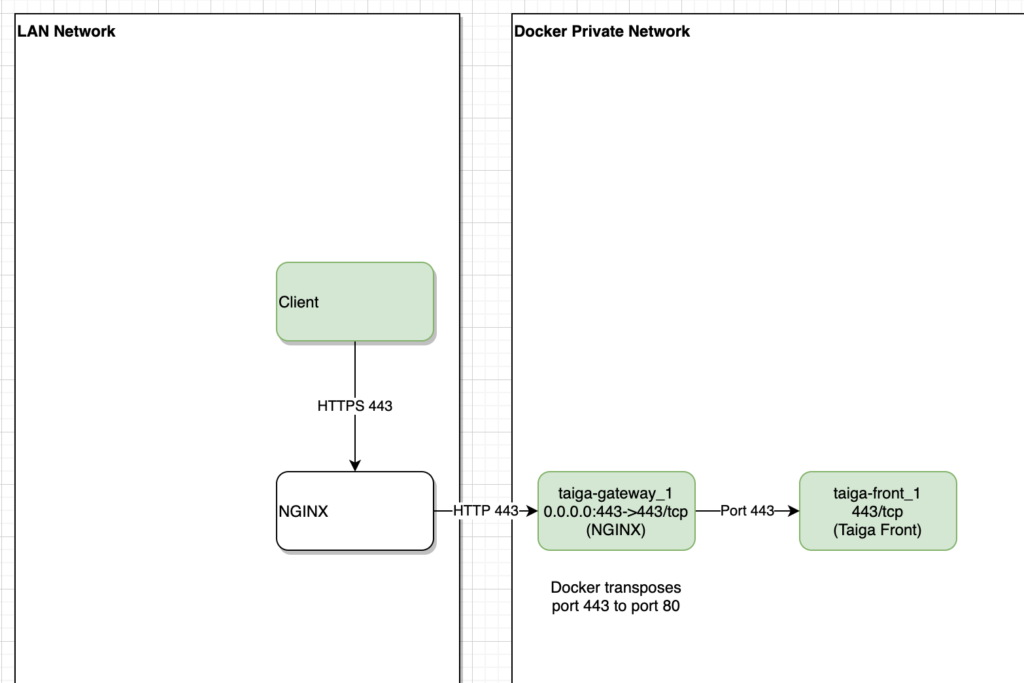
Also clearly this is not typical given there is port 443 being used for non-encrypted tunnelling between the nginx reverse proxy and the nginx proxy that comes with Taiga. The key to understanding this is to look at how things communicate. To explain that, I’ve copied in a simple diagram below. I agree it’s not very clever but from what I can tell, you can’t really encrypt that side of the traffic and it’s a limitation of how taiga has been coded. Hopefully I will prove that wrong at some point, but so far no luck!

Anyway, I hope this helps someone and perhaps promotes this great open source Agile tool also. Next on the list is to figure out why the events in it isn’t working!
Marshalleq